Basic
High-Efficiency Wood Stove
Over forty percent of
the energy available in wood begins as smoke. If this smoke is not
properly burned it either clings to the inside of your chimney as
creosote, or goes off into the air looking for a lung to pollute.
A bright orange fire
and plenty of oxygen are required to burn smoke, conditions not
always found in wood stoves. Indeed, when you close the doors and cut
down the air supply on your wood stove so that it will burn all
night, most stoves lose this energy.
On the other hand,
when you give it plenty of air, you often have too much heat, and a
fire that doesn't last very long, so what do you to do? You build a
version of this stove.
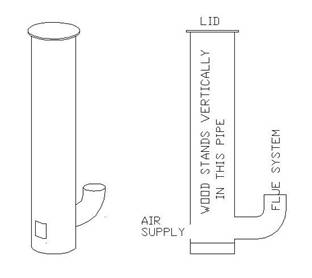
This stove consists
of a vertical tube with a lid on top, an opening for air at the
bottom, and a flue also connected at the bottom -- just opposite the
air inlet.
Firewood stands
vertically in the tube, and gravity-feeds into a small hot fire
between the air supply and the flue. Any smoke rendered in the wood
farther up in the tube must pass through this oxygen-rich fire in
order to get to the flue. The result is a long, efficient burn with
no smoke and very little ash.
I made my first
version of this from a 5" diameter piece of sheet-metal pipe,
about 30" long. I used 3" pipe for the flue. Use at least
10’ of flue to develop a satisfactory draft
If you attempt to
build this one, connect the ELL to tabs bent outward from the flue
hole in the base. This is so that the wood descending vertically will
have nothing to hang up on.
The first time I used
it I fed it a couple of 2x4's, and it burned for over two hours.
Usually, you'd want a higher rate of heat, so thereafter I would
split them lengthwise for a quicker burn. This is a great little
thing for miscellaneous sticks, pallet wood, and scraps normally
considered junk.
Inasmuch as the
average fire is more intense in this stove, there is remarkably
little ash to deal with. You may also notice that the ash that does
remain is a lighter shade of gray than that dug out of other stoves.
This too is because the burn has been more efficient, and less carbon
remains behind in the ash.
The fire can be a
little tricky to start, because the smoke wants to travel up the
larger pipe until the draw up the flue becomes convincing. Sometimes
I’ve made a small (1/2”) hole near the base of the flue
to insert a burning scrap of paper to initiate the draft.
Another thing to be
careful of is that if the fire drops to a smolder, sometimes the
draft can be lost and smoke begins to come up the wood storage
magazine and into the room – rarely, but I’ve seen it
happen with a minimal stack height.
The stove is an
excellent compact, high-efficiency concept though, and a more serious
version using 8" diameter pipe and a larger base area lined with
fire-brick warmed our house through several winters in Colorado.
I have found that 6”
pipe with a 4” flue is about optimum for a minimal stove. Use a
1-1/2” square opening about 2” above the bottom for the
air input. This is to allow for a layer of gravel to protect the
bottom sheet metal cap, and for a limited amount of ash storage. Have
the bottom of the flue opening at least as high as the middle of the
air opening.
Water
Heater for Woodstove
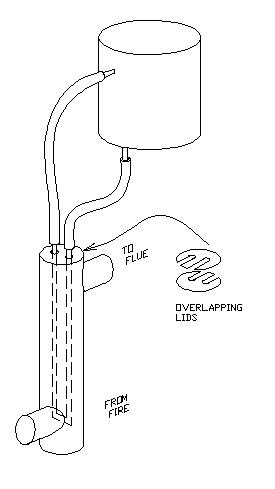
A simple water heater
can be made for this woodstove by having the flue gasses pass through
a two-foot section of 4" diameter pipe.
A U-shaped piece of
1/2" copper pipe is suspended in this section. Even though this
pipe is exposed to orange-hot flue gasses, any solder joints will not
melt, because it will be filled with water.
I connected the ends
to a five-gallon can suspended from the rafters in my shop, with 5/8"
automotive heater hose. The connections to the can were made to
pieces of 1/2" copper pipe – one soldered into the bottom,
and the other soldered about half-way up the side.
I messed around with
a version of this that was connected to more fire and a 55-gallon
drum, but never got around to completing the project; I did get far
enough however, to say with certainty that it can be done.
To really be
practical of course, any such container would have to be insulated,
and have a spigot for removing hot water.
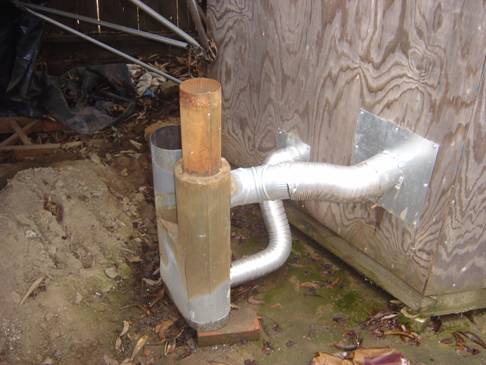
Wood
Chipper Replacement
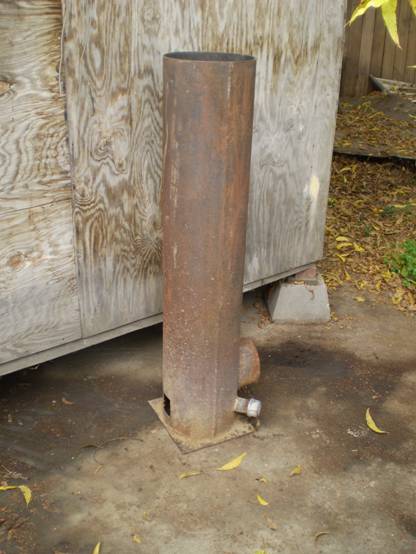
Speaking of “more
serious”, I made a 5’-tall version of this 10”
diameter stove for a farmer who grows fruit trees (the one shown is
4’ tall). By using a 6” diameter stack about 15’
tall there was enough draft to run it with the lid off, without
having smoke run backwards up the 10” pipe.
It is very important
to use a spark arrestor on all wood stoves. I believe the forest
service requires 3/8” mesh, but I always make a capped tube of
¼” hardware cloth that extends about a foot above the
end of the flue.
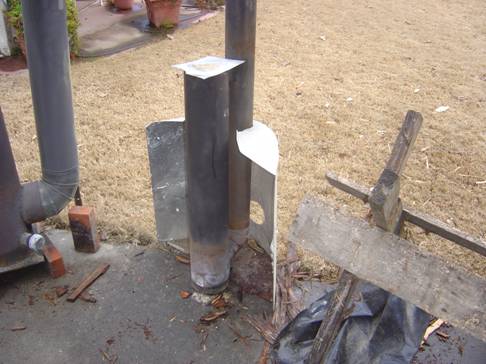
The air inlet is at
the bottom on the left, and the 6” flue connection is at the
lower right. The capped pipe at the bottom right has a mate on the
other side. This option allows extra air right at the exit point, to
help keep the flue entrance free of ash.
With pollution
restrictions it is increasingly difficult to burn the tons of sash
(branches and twigs), so they must be ground in a chipper and shipped
off to a biomass disposal site. The chipper of course consumes
petroleum and by involving the drilling, pumping, refining, and
transportation industries, it does its share of polluting.
This stove was able
to consume sash almost as fast as the chipper, used no gasoline or
oil, and produced no visible emissions.
There are
agricultural processes where incredible amounts of propane and other
petroleum-based fuels are consumed as heat. It would make a lot of
sense to use agricultural waste as a source of heat – consider:
· It
would spare the eco-damage of mining, refining, transporting, and
burning of vast amounts of fossil fuels.
· The
fossil fuels would be replaced by renewable fuel, resulting in no net
increase of greenhouse gasses
· Transportation
costs would be greatly reduced since the fuel would be produced
within agricultural areas near where they would be used.
Reflected
Radiant Heating
By placing a
parabolic reflector behind the stove, you can feel significant
radiant heat from a dozen feet away. This is ideal for breaking the
chill under a patio roof with a stove placed just outside.
A flue pipe may be conveniently wired
to 10’ length of ¾” metal electrical conduit for
support.
Small Forced
Air System
I was able to heat a
small shed by enclosing the base of a stove and a portion of the flue
pipe in a sheet metal shroud, and drive air through it via flexible
metal tubing. A blower mounted in the shed forced air through the
system. It worked OK, but would have been more efficient if I had
insulated the ducting and the shroud.
A word of caution
here: There is no regulating the temperature of this air, and it
could get hot enough to light things on fire. The upper tube joined
the shed through a metal shield to prevent it making contact with
wood. All fires are dangerous, and as I am merely sharing my
experiences, I can’t be responsible for what anybody else may
do.
I must confess that I
initially mounted a muffin fan directly on the shroud, and even with
air flowing through it, the radiant heat was enough to burn it up. If
you aren’t making any mistakes, it’s because you aren’t
doing anything at all – but please be careful.
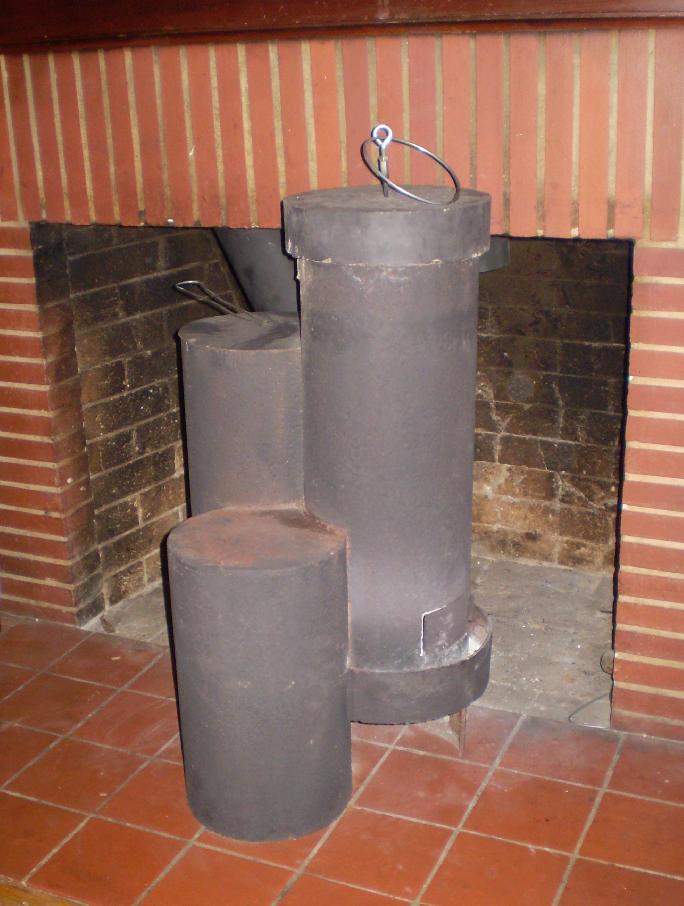
Insert
Retrofit
Under the best of
conditions, burning wood in a conventional masonry fireplace only
gets about 20% of the energy available in firewood it into the living
space. Typically, the percentage is much smaller. If the flue is left
open between fires, a great deal of heat is then siphoned out of the
house.
I blocked off my chimney at the top of
the fireplace with sheet metal, and cut a hole in it to accommodate
the flue of a free-standing wood stove.
This stove experiment
shown below was welded up from well casing. It features additional
chambers that serve to dissipate heat from the flue gasses before
they exit the system.
There is also a lid for the removal of
ashes pushed through to the flue area, as well as an ash tray visible
through the screen below the door on the air opening.