Smoke-free
Cook Stove (mud)
This project was inspired by a
situation observed in Guatemala. While visiting the refugee village
of El Gorrion, I found myself gagging on smoke drifting from a nearby
kitchen door.
A woman was cooking on a masonry bench
over an open fire with no chimney, but there was an opening in the
roof where smoke could exit – prevailing winds permitting. I had
seen such cooking arrangements in various parts of Mexico as well.
Next to this was a larger stove with an
expanse of steel plate and a vented chimney. This was not being used
because it required too much firewood. I had earlier spotted a
propane stove in another room that was likewise not being used. In
that case, they could not afford the propane. Here we have two
solutions to a very serious and widespread health hazard that are not
being employed because of economics.
Upon returning to the States
I began to define what it would take to solve this problem:
It must be smoke free, or nearly
so.
It must require the same or a
lesser amount of firewood.
It must use materials that are
cheap and locally available.
It cannot be larger than the
existing cooking area.
It must require little or no
modification of existing cultural practices.
It must be perceived as desirable
to the target population.
Tooling requirements must be
cheap, and accessible in the target area.
I built a 21” square box from scraps
of plywood on hand, and packed it with earth. This mass was then
sculpted internally to create a burn chamber, channels for combustion
air and exhaust flow, and a dual-function cooking surface. The
resulting prototype serves the above criteria in a variety of ways:
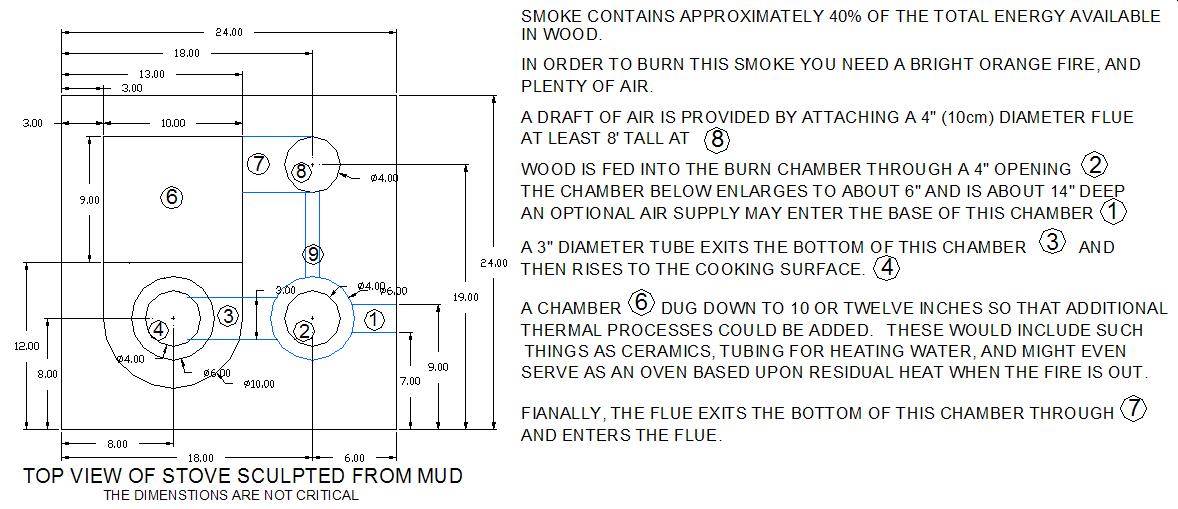
Typically, slightly more than 40%
of the energy in firewood is in the form of smoke. By burning the
smoke, less firewood is needed.
The fire is completely contained
within the structure, so less energy is lost to convection.
The flue gasses are contained and
directed against the bottom of a cooking vessel, rather than being
free to wander around it and be wasted.
This exhaust then flows across the
bottom of a steel plate, so that tortillas etc may be prepared while
food is being boiled. Doing both of these at once instead of in
sequence per tradition, shortens the amount of time that the fire is
needed.
The fire itself is well served by
small twigs and other scraps not normally useful as firewood. This
greatly increases the amount of locally available fuel.
In addition to these five
techniques for reducing expense, an externally vented flue
eliminates what may remain of the smoke.
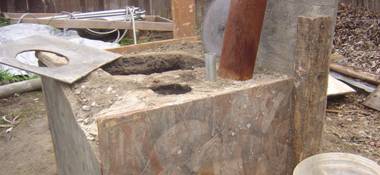
The prototype was sculpted from
earth – available anywhere but downtown. About 10’ of 4”
single-wall flue pipe is required, and also a small plate of steel.
The area of the top surface of
this prototype is smaller than any cook surface I’ve seen in the
homes I’ve visited, but scaling upwards by a few inches should be
no problem.
This stove could be sculpted from
an existing cooking bench. This would insure economy, size, and
minimal impact upon cooking practices.
There is no way to predict the
acceptability of this stove with any certainty. It may need to be
demonstrated or otherwise marketed before cultural acceptability can
be ascertained.
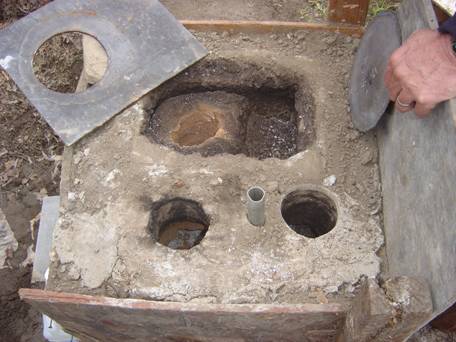
In this top view, the 4” hole
on the lower left opens out to a 6” diameter burn chamber a few
inches below the surface. The overall depth from the top surface is
about 14”
The exhaust from this burn is taken
from the bottom of the burn chamber and directed upward through the
4” hole rising in the pit in the upper part of the photo (You can
see the terracotta coloring lining this hole resulting from the
firing of the earth by the high-temperature exhaust).
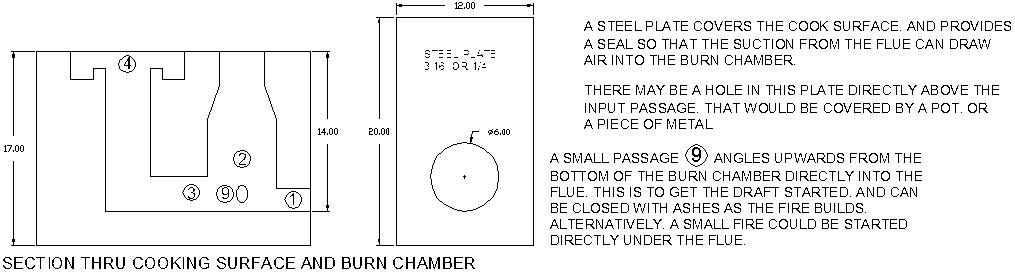
When the plate in the upper left is
placed over the pit, a pot covering the hole receives the full
benefit of this blast. The flue gasses then pass under the plate and
exit into the flue which is inserted in the 4” hole at the lower
right.
For the benefit of any interested, I am
including drawings showing the approximate dimensions of this unit. I
also add a few additional notes and comments.
Adjustments:
The photos above are of my very first
attempt at this type of stove. Although it seems to work very well,
there is currently no base of application experience (other than a
test that showed it could boil water faster than our modern gas stove
in the kitchen).
Materials
This original was made from earth far
more suited to gardens than structures. I would recommend trying a
mixture of coarse sand, clay, and maybe some dried grass mixed in –
here’s my reasoning:
Without some clay, the soil will
crumble too easily, even when completely dry.
If it is pure clay, the thermal
stresses and drying will create cracks, and possibly explode pieces
off from the insides of the chambers and passages.
The grains of sand will not expand
and shrink with temperature changes as much as the clay, and changes
in moisture will not affect them at all. This will help stabilize
the mixture.
Cracks attempting to propagate
through the mass will be frustrated by constant detours around the
grains of sand.
I am uncertain as to the optimum
ratio of sand to clay, but feel it should be just enough to glue all
the grains of sand together. I don’t think the ratio is very
critical, but I would expect that about three parts sand to one part
clay would be an acceptable starting point – almost anything would
be better than the garden soil I used.
The dried grass would permeate the
mass with small tubes as it decayed, and was burnt out. This would
increase the insulating properties, relieve thermal stresses, and
terminate cracks. This could be very important when higher ratios of
clay are used.
Perhaps a higher percentage of
clay with a small amount of cement added would be a good as a
plaster for hardening the top surface.
Tooling
In seeking to verify the simplicity of
this project, I filed a chisel edge on a 2-foot length of 1/8” X ¾”
mild steel to use as a sculpting tool. It was quite effective. I also
used a simple screwdriver to define internal passages. The entire
project could be well served by these simple tools.
Skill and patience could have created
the nice round holes you see in the photos above, but having neither,
I designed and fabricated the 4” diameter auger that actually
produced them. It may sometimes be desirable to sculpt such a stove
from an existing cooking platform. I was able to drill my auger
through a well-dried experimental block of one-part clay to two parts
sand, and use the chisel mentioned above to sculpt a well defined
notch in it. This approach appears to be quite practical. In cases
where an existing cooking platform is brick or concrete, a hammer and
a tool-steel chisel may be required.
Although the auger was only about
two-feet long, the shaft was made of ½’ all-thread, topped by a
handle that could be unscrewed. This enabled me to add extensions if
I ever needed a deeper hole. A stove-related application of this
could involve boring down through a common 3’- thick adobe wall.
Care must be taken however to adequately cap such a chimney so that
water could not enter and deteriorate the wall.
Principles
In order to burn the smoke (and render
the additional 40% of the available energy I mentioned), you need a
bright orange fire, and plenty of air. Therefore a stack of at least
eight or ten feet is essential to create a strong enough draft.
This must also be coupled with a good
seal between the burn chamber and the flue. Air leaking under the
edges of the steel plate, and from around the pot or plate sitting
over the hole in the plate can significantly reduce the stove’s
effectiveness.
During the burn it would be well to
cover either the hole above the burn chamber, or the vent that comes
in from the side (the top could be covered by a second cooking vessel
for that matter).
In the photos and drawings you can see
that the pit is shallower on the end where the flue gasses enter.
This is to force them closer to the bottom of the pot. By creating a
raised ring around this opening (visible in the drawings but not in
the photos), the pressure against the gasses can be relieved
immediately after their application to the bottom of the pot. This
allows for a better draft.
The intent of the pit is to allow for
further options and experiments – consider:
I have already been able to fire a
simple clay structure in a second prototype with a larger pit. Any
household using such a stove could also dabble in ceramics.
If the deep end of the pit were
14” X 10” X 7”, you might be able to fire a brick 12’X6”X4”
(30cm X 15cm X 10cm) every time you cooked. By the end of a year
just one brick per day would give you a wall a meter high by at
least three meters long. A community project could doubtless be
served within weeks.
Bricks of this size could span the
pit, creating thermal storage and insulation that would allow the
pit to serve as an oven after the fire was out. Indians of the
Southwestern United States would cook their bread by building a fire
in a clay oven, then removing the ashes, and inserting the dough.
A fire could be built in the pit
itself to roast meat in a vented barbeque.
Piping could be installed to heat
water in a tank elevated adjacent to the stove – a primitive
kitchen with hot running water!
A Stirling-cycle engine could be
run off this scavenged heat to produce enough electricity for modest
lighting – enough! I’d better stop before I get too far out of
hand, but I still have a lot more ideas.
I am certain that needs and local
inspiration in the field could contribute much to this project, and I
would be quite eager to hear of anything related to this that may
occur in any part of the world. I am also quite interested in
discussing appropriate technology needs that may arise from any
quarter.
In closing
It is ironic that while in the United
States we are seeking to wean ourselves of a petrochemical addiction,
the poor in developing nations might leapfrog past us to a high
quality of life, while maintaining a locally sustainable
infrastructure.
This cannot happen unless attention is
given to growing fuel locally. This stove can effectively use twigs
unsuitable for current cooking fires, and it can thereby decrease the
wait between planting and harvesting of fuel. It is essential
however, to fill in fence rows and any unused spaces with fuel
plants.