Lighting
The
amount of lighting needed, like many commodities, is more dependent
upon how it is used than on how much you have.
It
is a given fact that the intensity of light is inversely proportional
to the square of the distance from the source. This means that there
is more light on your book from a 10 watt bulb 2 feet away (10/4
=2.5), than you would receive from a 200 watt bulb that was 10 feet
away (200/100=2). Going a little further, you would find the same
amount of light one foot away from a 1 watt bulb, as you would ten
feet away from a 100 watt bulb.
Another
way to enhance the utility of light is by reflecting it in the
direction you need it. I have used small automotive fixtures with
built-in reflectors for effective low-power reading lamps in camping
situations. Look into clearance lights and such at a local auto parts
store. You may have to throw away a colored lens, but you can
probably find what you need.
Even
within the conventional lifestyle, I have sometimes backed up
lighting with shiny aluminum foil, when I could do it in a way that
it was not normally visible.
Still
another way to optimize your lighting is to use levels that are
appropriate for the activity at hand. For instance, normal movements
around the house and relaxed conversation are comfortably managed at
greatly reduced light levels, and dinner by candle-light has rarely
been a direct cause of stress. In fact, I find a lower light level
environment more relaxing. Save the kilowatts for tedious hand-work,
reading, and locating lost contact lenses.
If
you put the light where you need it, and in the amounts that are
appropriate, you can substantially lighten your bill (pun not
intended, but oh well).
Sources
In
order to keep electrical hazards to minimum, I recommend keeping
electrical circuits to a low voltage level. A 12 volt system makes
the significant variety of automotive lighting sources available.
Among
electrical lighting options incandescent bulbs are the least
efficient. Fluorescent bulbs are several times as efficient as
incandescent bulbs, and last several times as long. These do require
special circuits to create the high voltages needed however. LED's
are more efficient than either, and are almost as simple to power as
incandescents.
Flame
is the ancient standard and comes in many forms. The simple technique
described below can get you started.
Oil
Lamp
Have
you ever found, or even pictured yourself in a situation where you
wanted light and there was simply none available? This lamp is so
simple and versatile that it can provide you with basic lighting
under almost any circumstance.
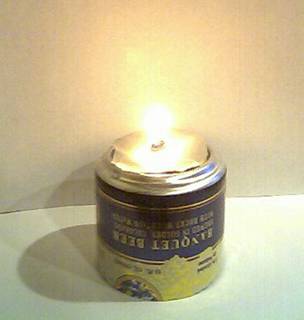
The
only materials required are an aluminum beverage can and a tuft of
fibrous material, such as toilet paper or cotton cloth. I even used a
piece of mineral fibred insulation during one minor emergency, and
powered it with a small amount of motor oil. The only tool required
is a pair of scissors or a sharp knife – in fact, I have used no
more than a sharp pencil and my bare hands.
The
lamp may be fueled by animal fat, vegetable oil, or mineral-based
greases and oils. I have had some problems with additives in motor
oil clogging the wick and self-extinguishing after short periods, but
even that doesn't make them entirely useless.
Begin
by cutting or tearing the can in half, and turning it over. Cut or
tear a circle about 2 inches across from the unused portion of the
can and poke a hole in it that is 1/4" to 3/8" in diameter.
Wad up your fibrous material into about a 1" ball and pull about
a 1/4" portion through the hole.
To
use the lamp, fill the depression in the inverted can with your oil
or grease and work some of the fuel into both sides of the wick. Lay
the wick assembly on the fuel and light.
If
the fuel is a solid grease or fat of some kind, the heat of the flame
will soon cause it to melt and flow, like an oil.
 The intensity of the
basic lamp is roughly equivalent to that of a candle, but its
effectiveness can be enhanced by the use of a reflector (from the
unused portion of the can). It can also be improved by the addition
of a simple chimney.
The intensity of the
basic lamp is roughly equivalent to that of a candle, but its
effectiveness can be enhanced by the use of a reflector (from the
unused portion of the can). It can also be improved by the addition
of a simple chimney.
A
chimney support may be made by cutting two pieces of wood to just
over 1/8" square by 1-1/2" long. Lay these parallel, about
1-1/4" apart on either side of the wick. Pull through an extra
1/8" of wick. Cut a disk of aluminum about 2-1/2" in
diameter with a 1/2" hole in the center. Lay this piece on the
sticks with the hole around the wick. Set a small chimney on the
disk.
If
you are really hard up for a chimney, break the bottom out of a small
bottle or jar by holding it under water and knocking the bottom out
from the inside. Use a metal rod (large bolt?) inserted through the
opening. The water will keep the glass from flying. I am sure there
are better ways, but this is the best of my experience to this point.