More
Technique
This is the category
for various projects and technologies that defy the boundaries of the
more specialized discussion.
The phase 1
industrial capabilities are limited to that which can be achieved
through portable hand tools. Metal work would be limited to cutting
and bending, but without power tools drilling would be impractical,
and standard welding techniques are of course unavailable. Punches
however, could drive holes which could be tapped to accommodate
screw-type fasteners.
There are techniques
where metals have been cut or fused using an intense compound called
“thermite.” When this compound is burned it gives off
enough heat to melt steel, and has been experienced by most of us who
have held sparklers on the 4th of July (The wire itself is
not consumed because it is titanium instead of stee)l.
Blacksmithing is
possible with wood fires using technologies described in the section
on “Playing With Fire.
Woodworking is a
different matter. Hand-powered wood drills have been around for
millennia, and there are no limits to what patience and skill can
achieve in this medium. My grandfather built large elegant homes
before the skill-saw was invented. Every piece was hand fitted and
hand cut.
The thermal processes
based upon wood fires make a wide range of crafts and tooling
possible. In addition to blacksmithing, consider ceramics, small
amounts of cements and plasters from limestone, seashells and bones.
Consider the
resources available within a single dead car or building that has
been, or is being demolished.
Phase
2 Industry
With electrical power
becoming available, various forms of metal fabrication are much
easier.
Depending upon the
power available, laptops or other computer systems may be practical.
If internet access is available, a whole new realm of opportunity is
opened.
If enough fuel is
available larger scale operations of ceramics, tiles, and other
thermal processes could be developed in specialized furnaces.
The primary impetus
of this document is to think in terms of the future. In the
nineteenth century there was an individual who traveled around the
Midwest planting apple trees; people knew him as “Johnny
Appleseed.” His giving mission in life freely blessed countless
families for generations to come. His life is an example of the
perspective we need if we are ever to get out of ourselves and become
a part of something important.
Sustainable living is
going to require renewable fuels. We need to be planting eucalyptus,
oak, and other “energy” trees in available spaces (public
or private) for our own future, and the future of others.
Phase
3 Industry
Petrochemicals are
being fractioned from biomass. Solvents and bases for paints and
plastics are available at this phase. Specialty plants are being
grown for their chemical properties.
Key components of
sustainable infrastructures are produced and marketed to other
village startups. Technology is packaged, taught, and exported. R&D
is forever increasing.
Creative planning and
adaptation scale increasingly higher levels of technology to small
community capabilities.
Few people in our
society have the privilege of creating original technical designs.
Generally that is left to the engineers, and only a small fraction of
engineers actually do creative design. Within the confines of modern
companies, engineers are forced to sign contracts that forbid them to
share designs they create or technology they learn about while
employed.
In the old days,
people needing some specialized form of iron went to the blacksmith.
He was the town artisan who had the tools and know-how to make or
repair just about anything made of iron.
In this village we’d
need a techno-smith shop, where creative people can take their ideas
for access to tools and brain-storming. By opening the creative
opportunities to anyone with creative ideas, and freely sharing all
that is learned with all who are interested, technology could soar.
INDUSTRY
THINKING
This group deals with
various techniques and ideas potentially helpful for meeting a
variety of needs of small-scale communities.
Home
Sheet Metal Basics
The
ability to fabricate simple sheet metal objects can greatly enhance
the versatility of the mechanically competent. The work itself is not
difficult, but if you are not careful you can waste a lot of valuable
time adding bandages to your fingers. I worked in a sheet metal shop
for a year and a half, and immediately developed the habit of
carrying bandaids in my wallet. This has remained a habit, and a good
one. Your own or someone else's child is always in need of a bandaid
for something, and it's nice to have one to offer. Soon however, I
developed the more logical habit of being careful.
If you are likely to
be doing a bit of household homesteading, and have room for a little
more junk, begin keeping your eyes open for sheet metal -- consider
the following sources:
1.
Construction site dumpsters, particularly at commercial projects
often contain large pieces during the phases following the initial
framing.
2. 5-gallon cans
can be modified or cut apart for many small projects.
3. 55-gallon drums
can provide a heavy gauge that is useful for some projects,
especially stove parts.
4. Consider metal
signs, metal roofing materials, pieces of flashing, and auto body
parts.
5. Houses being
demolished, or about to be, can often be good sources. Flue pipes
from stoves, furnaces, and water heaters are valuable in their
present form. Also look for heating ducts and furnace plenums. The
exterior of water heaters is normally one large sheet of metal.
6. Hate to
disappoint you, but though I have obtained metal form all of the
above sources (except the water heater), I have bought most of my
sheet metal from hardware or heating supply stores.
The
tools you need for any of the projects I describe here are a pair of
tin snips, a tape measure, a straight edge (preferably a metal
yardstick), a scribe or awl, a pair of pliers, a hammer, and a drill
with an 1/8" bit.
There
are a few additional things that are nice to know if you have the
resources and urge to go beyond the minimum:
Not all
tin snips are the same. The most basic and frequently needed tin
snips are called "straight snips". These are designed for
straight cutting, and will also cut reasonably well in a
counter-clockwise direction. If the handles of straight snips are
anything besides black, they will probably be yellow or grey.
Left-handed snips are made to cut circles in a clockwise direction,
and are also capable of cutting straight. Normally they come with
green handles to indicate their style. Right-hand snips
cut counter clockwise, and they wear red.
The
least complicated fastening system uses #8 sheet metal screws in 1/8"
holes. But for a speedier and cleaner-looking job, you might consider
getting a pop-rivet gun, and a supply of 1/8" pop rivets. Screws
of course, are reusable and are easier to remove, but once you learn
to quit making mistakes, that ceases to be an issue.
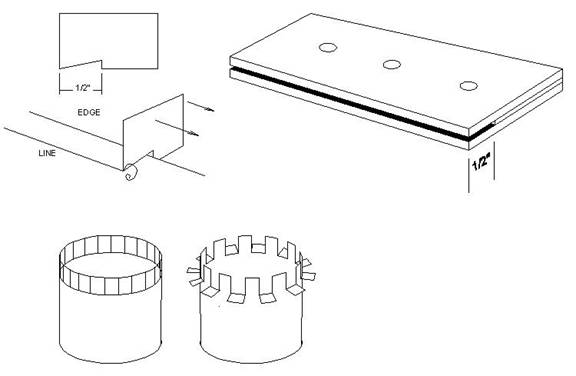
Since
1/2" is the most common dimension used in sheet metal work for
forming joints and edges for corners, a tool for making lines 1/2"
in from an edge can be very handy. Such a tool can be easily made
from a small scrap of metal (The sketch illustrates how to make it
and use it).
A line
is made by hooking the tool's notch on the edge of a sheet of metal,
and running the tool along the length to be marked, while dragging
the point along the metal surface. NOTE: For most of your sheet metal
work you will find that lines made by scratching are adequate, and a
scribe (think: screwdriver ground to a point) is normally used for
this. A scribe is also frequently driven by a hammer to mark
measurement points that define lines to be drawn. There are times
however, when a felt-tipped pen is handy for making custom fits, as
in cases where you are joining the end of one pipe to the side of
another pipe.
Frequently
you will be bending a half-inch strip along an edge at right angles
to the rest of the work. A simple break that will assist in this task
can be made by bolting together a couple pieces of 1/8" steel,
with about a 1/16" spacer sandwiched between them. You can buy
1/8" steel in 2" wide strips at hardware stores, and if you
don't have 1/16" sheet metal, stack a couple of
precisely- cut thinner pieces together. This spacer should be
set back 1/2" from the edges of the 1/8" steel, and the
length can be whatever you consider convenient. If you set your
spacer 1/2" in from both an end and a side, you will have a tool
with two sizes. In the tool I made for myself, I also indented the
back side to 1/4", and one of the ends to 3/4" -- might as
well make it as versatile as possible.
Fifty-five
gallon drums are handy resources in themselves, but modifying them
for other functions is more than tin snips can manage. The easiest
way to cut up a drum is with a cutting torch, but if you want a
cleaner cut, or don't want to risk some nasty consequences of
combining fire with unknown leftovers within the drum, an jigsaw with
a fine-toothed metal cutting blade does a nice job (You could still
light things off with it, so know what's in there before you mess
with it at all). Take your time, don't try any sharp corners, and
you'll do alright. If all you want to do is cut an end out, use a
cold chisel and a hammer around the inside edge of the rim. Unless
you are trying to prove how macho a deaf person can be, I would
recommend that you put some kind of protection in your ears for
either of these operations.
For
lighter gauges of sheet metal, cutting a hole is begun by driving a
scribe or screwdriver deeply through metal near the center of the
hole-to-be. The scribe is then bent sideways and moved around to
enlarge the hole as much as convenient. Insert the tip of the snips
into the hole and begin cutting in a spiral pattern as required until
the line defining the edge of the hole can be reached. I find it
convenient and safer at this point, to cut out a smaller circle from
the center of the hole, before completing the hole to its' finished
dimension.
To
prepare the end of a pipe for joining to another piece of metal, or a
cap, cut a series of 1/2" deep slits around its' end, about 1/2"
to 3/4" apart.
I find
it best to make the first cut next to the seam of the pipe. As you
approach the completion of the circle, adjust the spacing so that you
wind up with an even number of slits.
When you
want to join flexible ducting to sheet metal work, or to a plywood
structure such as the back of a home-made solar panel, prepare a
short (4 to 5 inches will do) piece of pipe in the
above manner to use as a collar. Try to do it so that there is a
crimped end available to make it easier to slide on the ducting. If
the wood is very thick, you might want to make the tabs a little
longer and wider than you would if you were attaching to sheet metal.
In order
to join the pipe to a hole, first bend every-other tab outward at
right angles Then stick the rest of the tabs through the hole and
bend them outward against the inside surface, securing this surface
between the outer and inner tabs. It helps at this point to take a
small hammer and lightly tap the outer tabs to set them firmly
against the outer surface.
If you
are joining the pipe to a hole in a curved surface, begin by
inserting the end of the pipe into the hole, and making a line around
the pipe where the edges of the hole meet it (This is where a
felt-tipped pen can come in handy). Trim the end of the pipe
around this line, and then do your slits and attaching as described
above.
Capping
a pipe begins with the same set of slits, but proceeds by bending
every-other tab INWARD instead of outward. You then lay a disk cut to
the inside diameter of the pipe on these tabs, and bend the remaining
tabs over it. Now you tap these outer tabs lightly to set them
in place. It makes things a lot tighter if you can hold a piece of
wood or metal against the inner tabs during this tapping
process.
Joints
at the corners of boxes are formed by bending a 1/2" strip along
one edge of one piece at right angles. This is then screwed or
pop-riveted to the other piece.
For
most of your sheet metal work you will find that lines made by
scratching are adequate, and a scribe (think: screwdriver filed to a
point) is normally used for this. A scribe is also frequently tapped
by a hammer to mark measurement points that define lines to be drawn.
Yet another use of this tool is to drive it through sheet metal and
twist it around to start a hole for shears to cut out an area. There
are times when a felt-tipped pen is handy for making custom fits, as
in cases where you are joining the end of one pipe to the side of
another pipe.
Petrochemical
Replacement
The
pyrolization of wood -- and perhaps other bio-materials -- could
provide many of the compounds that currently bind us to the petroleum
industry.
This
would place access to of hydrocarbon compounds into the hands of
people who didn't support oil wells or coal mines. It could
also move the continued development and supply of hi-tech materials
into a renewable and decentralized basis.
Such
an operation would be a lot more complex than many of the other
projects described here. The program however, would both
support and demand a technically competent community, and could
supply key compounds for other communities. Among the simpler
products one might expect would be motor fuels, solvents, lamp oils,
lubricants, and preservatives for wood.
There
have been times of emergency in Europe when vehicles have been fueled
by wood smoke, driven out of sealed chambers that were heated by wood
or coal fires.
A
wide variety of nasty and beneficial compounds can be driven out of
wood as it is slowly heated. The trick is to catch them and to sort
them out.
The
basic apparatus would consist of a sealed batch "cooker",
which is followed by a series of progressively cooler still-segments,
each with its own catch-vessel.
(1)
Exhaust froma clean-burning flame passes through a thermal process
chamber heats a sealed vessel containing biomass (2). The
resulting gasses exit through an insulated tube
(3),
and pass through a series of sequentially cooler distillation modules
(4). Each of these modules is maintained at a temperature range
selected to distill a specific group of compounds. Finally, any
remaining gasses are bubbled through water and stored in an inverted
drum (5) to capture any true gasses, and make the entire operation a
zero-emissions process.
The
water through which the gas is bubbled would be processed to harvest
dissolved compounds. The carbon left behind in the chamber (6)
would be a clean solid fuel for cooking and heating, and would be
well activated for filtering purposes.
Ceramics
Almost anything from
bricks to engine parts can be fabricated from ceramics. Refer to
“Energy Tree’ for more ideas along these lines.
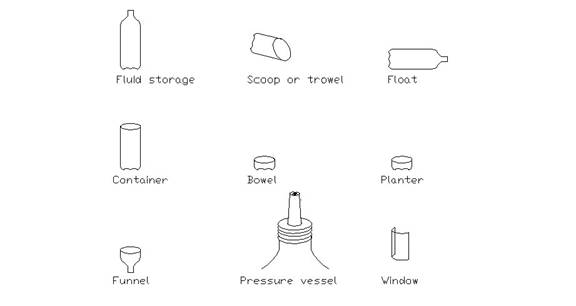
The
Plastic Soda Bottle
Have
fun with the little things. Practice looking at the world as if you'd
just stepped into it, and nobody had yet told you to grow up.
Pick up a plastic soda bottle and be astounded. Look through
it. Listen to it. Hold it in different positions along-side common
household items.
I've
used these things in several ways they were never intended to be
used. Here's a few of them.
Non-Explosive
Demolition
Ok,
so not every one of these relates to everyone, but once in awhile
some of us need to split a rock or two when we don’t happen to
have any dynamite on us. So one evening when I was
contemplating on how to modify some boulders in my life, I came up
with a technique that can split rocks without the use of explosives.
I
drilled a hole in about a 50 lb test rock, filled part of the hole
with water, and inserted a bolt that just barely fit into the
hole. The theory was that if I whaled on the end of
the bolt with a hammer, the pressure of the water would split the
rock: In reality, I got wet.
Giving
up is not usually the first thing that occurs to me, so I replaced
the water with mud, and this time I remembered to close my mouth
before I struck the bolt.
The
rock parted neatly. It was interesting to note that the resounding
ring I was expecting upon the contact of the hammer on the bolt was
replaced by a subdued “sput” as the energy was absorbed
in the splitting of the rock.
One
other thing that might be considered – which I did not try –
would be to use something like modeling clay in lieu of water or mud
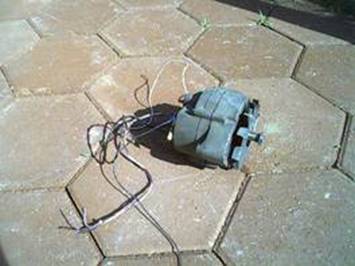
Stepper
Motor From Alternator
If
you don't know what a stepper motor is, then you probably don't need
one. These motors can be made to turn a few degrees at a time, and
are used under computer control to position various objects.
I
had an application where I wanted to move short pieces of 6"
pipe under a cutting torch for the automated cutting of various
features. I was able to get it to work from a couple small
stepper motors I had lying around, but I really wanted a better
margin of power and speed. I then begin to consider the
possibilities of an automotive alternator.
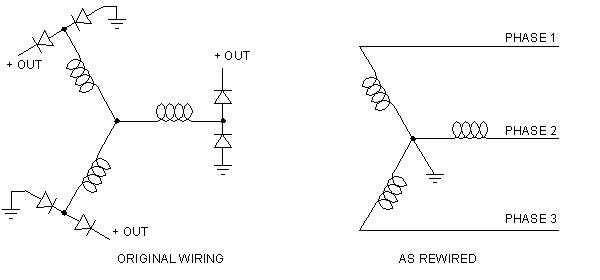
The
3-phase stator windings of the alternator are wound and connected as
shown on the left here.
By
throwing away a half-dozen diodes and rewiring the stator as shown on
the right, you have a stepper motor.
By
applying a voltage sequentially to each of the phases, and energizing
the rotor by another voltage source, you can get this modified
alternator to step in either direction.
The
alternator I got a hold of gave me 21 steps per revolution, but by
applying voltage to two phases at a time, I was able to get
half-steps, for a total of 42 steps.
The
stator windings have extremely low resistance, and at even 6 volts
you may find yourself burning your alternator.
The
simplest way I have found to regulate the current is to put an
automotive lamp in series with your windings; you may need a head
lamp to find one large enough. Begin by selecting one of about
4 to 6 amps, and go up or down from there according to your needs.
Another
method, which I did not try, would be to use pulses at a frequency
that would allow the inductive reactance to keep the current to
acceptable levels.
A
third method would be to rewire the alternator with more turns of a
finer wire.
Beyond
these suggestions, you should keep your voltage down.
In
their intended automotive application, alternators are constantly
cooled by a strong blast of air – not so in this application,
so you may need a fan.
Generator
Analyzer
Determines the maximum power
available from an electrical power source
Determines the maximum power
available from an mechanical power source
Determines the optimum load to
derive maximum power.
Determine optimum rpm for maximum
power
Principle:
If voltage is
monitored while current is incremented through a known ramp, the
maximum available power will be point at which the product of voltage
and current are the greatest.
The voltage at this
point, is the optimum point on the power curve
When this voltage is
divided by the current, the optimum resistive load is calculated.
Alternatively, the
maximum available power and optimum load can be determined for any
specified voltage.
Circuitry:
A programmable constant-current
generator capable of handling the maximum power, voltage, and
current to be measured
MOSFET/S and heat sink to control
current flow
The MOSFET does not have to
handle the entire load. It can be in series with a resistive
appliance such as an incandescent light or heating element. This
however, will limit the maximum current available.
Precision sense resistor
Op-Amp
Programmable low voltage source
for source voltage (use uC ADC to monitor for current indicator)
A voltmeter
A processor to compute the results
A multi-functional readout to
present the results
Alternative System:
A far less
sophisticated solution would involve monitoring the voltage at
specific levels of load. In this case only a series of resistive
loads sufficient to test the power source and a volt-ohm meter would
be required.
Nichrome from heating
appliances could serve as resistive loads, and they must total
sufficiently low resistance to pull the source output well below it’s
maximum power output capability. During tests they would be submerged
in water to keep heating from changing the resistance.
The voltage would be
measured with increasing loads applied, and the power would equal the
voltage squared divided by the resistance at each point. These points
would then be plotted and points between extrapolated from a
connecting curve.
Additional Discussion:
This would be an item
of a quasi high tech nature that would be convenient but not
essential. It may have significant market value during a transitional
phase of characterizing and debugging small-scale Stirling power
systems.
The
rest of the world runs on greed, and greed requires things, so in
order to connect with the rest of the world, we need to create things
for them to be greedy about. It would be ideal however, to select
products that would help them become wonderful like ourselves, so
consider products that would lead them away from the maelstrom of
centralized profit power, and into the low-cost prosperity of
localized sustainable living.
This
makes it easy for we who chose to climb out of the system rather than
drop out, because we would have experience in hard-to-find
commodities of great intrinsic value.
Caution
would be required in this arena however, in that there must be no
true dependency developed on external involvements, or we would soon
find ourselves paved over like the rest of the prospering world.
On
the other hand, since at this point most of us are already “paved”,
the development and marketing of various products and services by a
consortium of pioneer wanna-be’s, may produce the tools and
resources to launch a village.
On
the low end of the scale consider a service of planting and
maintaining high-density
vegetable gardens for
the saner fringe of society who desire healthy diets but would rather
not dirty their hands. It could also be that they are obliged to
spend eight hours every day working and two hours per day commuting,
so that they can make enough money to really enjoy life. By spending
a few hours per day doing something you really enjoy, you could
support your low-expense lifestyle and help out a dozen or so such
clients.
High
efficiency wood-fired cook stoves might
be a hot item for those who toy with thoughts of sustainable living,
or desire an emergency source of cooking and heating.
The
built-in thermal process chamber in these units could also be used
for heating water, blacksmithing, the production of power, or as a
kiln for some ceramic projects.
Stirling-cycle
engine/generator systems capable
of producing a couple hundred watts from a gas or wood-fired stove
may be marketable as emergency power sources. Such could provide
power for emergency lighting, laptops, and cell phone chargers.
Since
a Stirling engine might also be used to heat or cool when powered by
an outside force, specially-designed units might provide
refrigeration. These could be used in tandem with conventionally
applied engines.
Heliostat
modules may
be a real crowd pleaser, and in many applications they could be in
high demand within our existing infrastructures.
Garden-scale
wells
might be practical in cases
where the water table was high enough (this worked for me at one
time). It would be difficult to justify complaining about removing
water from the ground, moving it a dozen feet or so, and pouring it
back into the ground through a garden. None-the-less, such an
activity might best be performed discretely. On a still more discrete
scale, a well for an emergency supply might be provided inside a
house or garage.
DOG TRAINER/REPLACEMENT
This
project was originally designed to train a neighbor's dog not to
bark. Returning a small beep for each bark seems to distract the
dog’s attention. Give the mutt about an hour to wise up during
his first lesson. The dog will still bark if he’s being chased
by an E.T. or a postman, but in most cases, the mindless endless
noise is greatly reduced.
The
circuit was built around a quad op amp (LM324). Sections A and B form
an audio amplifier. The variable 10k pot controls the gain of the
signals provided by the microphone.
Section
D is a timing circuit which is triggered by the output of the
amplifier. When triggered, pin 14 produces a negative-going
pulse of about 1/2 second. This pulse enables the audio
oscillator while blocking the signals from the microphone.
Section
C, the oscillator, produces a tone which drives a piezo speaker.
The
parts were picked up at a local Radio Shack ®.
The
pulse at point 5 could drive a relay to move heavier objects, such as
something to pound on your neighbor's wall when his stereo gets too
loud (This circuit can potentially train other stupid things besides
dogs).
A dog
hears a soft sound and then barks. By connecting the
above-mentioned relay to a recording of a dog barking (or of the
action of a 12-gauge shotgun chambering a round), you could offer to
replace your neighbor's dog. The duration of the pulse can be
increased by increasing the 4.7uf capacitor.
By
replacing the microphone with some other stimulus at point 1, this
circuit could become a general-purpose burglar alarm.
I don't
know what you could do with the oscillator. You might use it to
modulate a low-power FM transmitter, so you could produce an alarm
tone through a nearby FM receiver.
In spite
of its versatility, this circuit is very gentle on battery drain, and
can be powered by anything between about 5 and 12 volts. This
makes it a good candidate for remote or camping alarm applications.