Wells
Poking
Holes
I
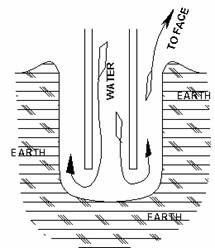
put down the above-mentioned garden well through a technique known as
“jetting”. Jetting is what happens when you push a gushing water
hose against the ground and it begins to dig its way in. Water erodes
the soil directly in front of the blast, and washes it back out of
the hole around the hose, and into your face and shoes.
With
a handful of fittings from a hardware store and a few simple hand
tools, I was able to connect the end of the garden hose to a six-foot
piece of ½” galvanized pipe, and then add other bits and pieces to
the drill string as the work progressed.
By
cutting a short piece of pipe (usually called a “nipple” – I
didn’t name it - with a hacksaw as shown, and coupling either piece
to the end of the pipe, the process was considerably faster.
It
helped to repeatedly raise the pipe a couple feet and force it
downward into the hole. This caused the inertia of the water in the
pipe to exert tremendous force against the bottom, and also helped
the sharp edges of the pipe to cut.
In
addition, I would twist the drill string clockwise as it struck the
bottom of the hole and return it slightly counter-clockwise as I
raised it. This would help the bit cut, while insuring that none of
the pipe fittings twisted loose. A large pair of vice-grip pliers
made an excellent handle.
One
other tip: Don’t drop any tools down the hole. It’s OK to be a
klutz, as long as you know you’re a klutz and take the time to
compensate. I made an anti-klutz shield from a piece of heavy plywood
with a drill-string-sized hole in it. By setting the plywood up on
some blocks, I was allowed room for the mud and water to escape to
somewhere besides my shoes.
There
is a story about this well for the amusement of those who would
considering me a nut or a liar, the amazement of those into weird, or
the interest of those of mystical experience. This has nothing to do
with anything technical, so the none-of-the-aboves can skip this.
When
I was considering the site for this well I was assuming I’d have to
go down a significant distance. A couple hundred feet in one
direction there was a century-old hand-dug well that went down 65
feet before striking water. About a hundred and fifty yards in
another direction, there was a well that went down 45 feet, and
produced plenty of water.
In
choosing a spot for this well I first considered consulting a “water
witch” as my dad had tried in the past, but that seemed a little
too occult for my tastes. So I figured I could just pray and ask God
where He put the water (for real). I tend to push it with almost
anybody, and in all fairness that includes God. So I figured that if
He’s really God, he could put the water wherever He wanted to.
“OK
God, I’d like it near that tree, not too far from the door of this
shack”. I struck water at six feet, but the day was young so I
continued to a depth of twenty eight feet – six hours and a sore
back later. I became suspicious about the value of the other
twenty-two feet, when everything below the six foot level was solid –
albeit soft – decomposed granite.
It
turned out that this layer of soft rock had trapped a stream of
surface water that I was able to trace to a mild seep a little
distance off, where the surface of the ground dropped away slightly.
The only evidence of this was a type of plant normally found only
near streams or ponds. With the combination of a 12V bilge pump and
the hand pump working simultaneously I was never able to pump it dry
while filling a 55 gal. drum, during an entire Southern California
summer. Thanks God.
Survival
itself is not life – a rock can “survive”, but life is a
platform, for so much more.
A
Little Bit More
It's
nice to be able to put down a well when you have an unlimited supply
of pressurized water, but it makes a little more sense to learn how
to do it in places where water has to be imported in buckets.
A
drop-bit consists of a cutting-end, connected to a hammer-end. The
whole thing is then dropped down the hole on a rope or cable. As the
cutter hits the bottom, the hammer lands on top of it and gives it
another kick. The hammer portion is then raised and lowered
repeatedly to drive the cutter into the rock or soil. This hammer
action also works in the up-direction, to free the bit when it gets
stuck in the bottom of the hole.
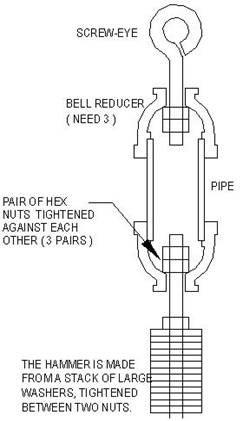
Periodically,
the assembly is withdrawn, and the section below the 1-1/4"
coupler is removed and emptied.
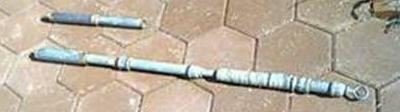
Although
I have produced a bit that basically works, I feel there is room for
a lot of improvement. This assembly was made from
off-the-shelf hardware available from most home-improvement stores.
The photo shows what I've developed so far. Note the spare bit above
and to the left of the hammer assembly.
The
bit is considered "dry" because a continuous stream of
water is not being forced down a drill-string. Sometimes
however, a half-gallon or so might be poured down the hole to soften
the bottom. It is helpful at such times to pour the water down the
rope, so it does not fill the bottom with mud washed from the sides
of the hole.
You
will find that different soil/rock conditions will need different
cutter sections. Some will produce a nice core from a round empty
cutter, and others will require a pair of flaps to trap loose soil or
mud. In some cases you might do cutting with one bit and soil
removal with another.
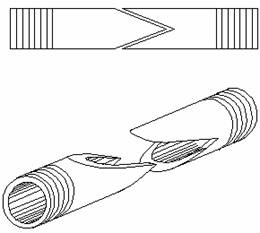
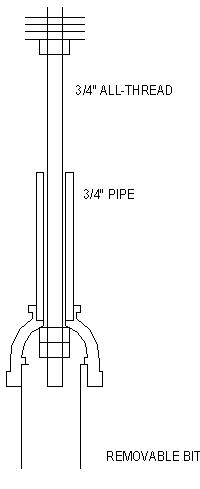
For
a basic cutter, cut four teeth in the bit at the bottom.
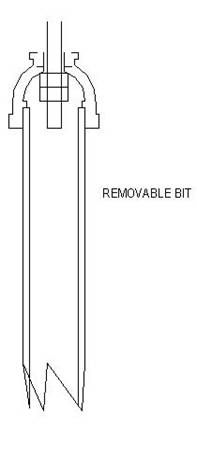
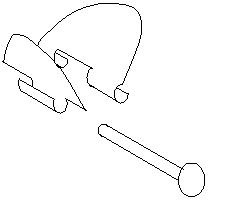
I
made a bit for removing loosened soil and thick mud by threading a
carriage-bolt through the bit and a couple of sheet-metal flaps, a
couple inches above the bottom.
The
flaps wrapped around the bolt the same way hinge pieces wrap around
their pin.
A
different form that could be helpful for getting out fine sand and
mud, after you've found the water table, is shown here.
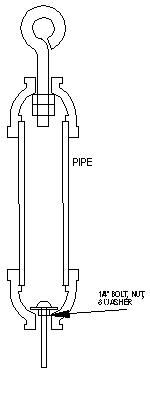 This mud bucket is
lowered on its own rope.
This mud bucket is
lowered on its own rope.
Make
no mistake: This well is a lot of work, and could certainly be
improved. It does however, make poking a hole in the ground
possible.
During
the process, be fanatical about regularly checking the status of all
joints, so you don't wind up with a half-drilled well being blocked
by a half-there drill assembly. I didn’t learn this lesson the easy
way.
Although individual household
storage may be practical at any level of development, it would be
important for the village to own the source of water and the means of
distributing it.
With the source of
water secure, a village-wide plumbing system could be developed.
Optimally however, each residence should have storage for both
potable and non-potable water. Such distributed storage would
increase accountability and awareness for the conservation of this
most precious and limited commodity. There should also be some
provision for the collection and recycling of grey-water for
agricultural applications. Bottom line: Use every drop wisely.
Such care and concerns may
be unthinkable in our current paradigm of plenty, but they will
ultimately concern us all, as they currently concern most of the
world.